Of all the preprocessing steps in FMRI data, normalization is most susceptible to errors, failure, mistakes, madness, and demonic possession. This step involves the application of warps (just another term for transformations) of your anatomical and functional datasets in order to match a standardized space; in other words, all of your images will be squarely placed within a bounding box that has the same dimensions for each image, and each image will be oriented similarly.
To visualize this, imagine that you have twenty individual shoes - possibly, those single shoes you find discarded along the highways of America - each corresponding to an individual anatomical image. You also have a shoe box, corresponding to the standardized space, or template. Now, some of the shoes are big, some are small, and some have bizarre contours which prevent their fitting comfortably in the box.
However, due to a perverted Procrustean desire, you want all of those shoes to fit inside the box exactly; each shoe should have the toe and heel just touching the front and back of the box, and the sides of the shoes should barely graze the cardboard. If a particular shoe does not fit these requirements, you make it fit; excess length is hacked off*, while smaller footwear is stretched to the boundaries; extra rubber on the soles is either filed down or padded, until the shoe fits inside the box perfectly; and the resulting shoes, while bearing little similarity to their original shape, will all be roughly the same size.
This, in a nutshell, is what happens during normalization. However, it can easily fail and lead to wonky-looking normalized brains, usually with abnormal skewing of a particular dimension. This can often by explained by a faulty starting location, which can then lead to getting trapped in what is called a local minimum.
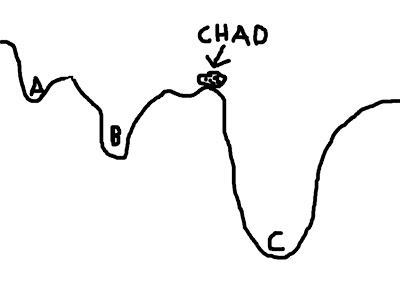
To visualize this concept, imagine a boulder rolling down valleys. The lowest point that the boulder can fall into represents the best solution; the boulder - named Chad - is happiest when he is at the lowest point he can find. However, there are several dips and dells and dales and swales that Chad can roll into, and if he doesn't search around far enough, he may imagine himself to be in the lowest place in the valley - even if that is not necessarily the case. In the picture below, let's say that Chad starts between points A and B; if he looks at the two options, he chooses B, since it is lower, and Chad is therefore happier. However, Chad, in his shortsightedness, has failed to look beyond those two options and descry option C, which in truth is the lowest point of all the valleys.
This represents a faulty starting position; and although Chad could extend the range of his search, the range of his gaze, and behold all of the options underneath the pandemonium of the dying sun, this would take far longer. Think of this as corresponding to the search space; expanding this space requires more computing time, which is undesirable.
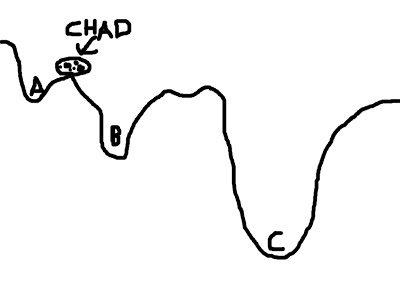
To mitigate this problem, we can give Chad a hand by placing him in a location where he is more likely to find the optimal solution. For example, let us place Chad closer to C - conceivably, even within C itself - and he will find it much easier to roll his rotund, rocky little body into the soft, warm, womb-like crater of option C, and thus obtain a boulder's beggar's bliss.
(For the mathematically inclined, the contours of the valley represent the cost function; the boulder represents the cost function ratio between the source image and the template image; and each letter (A, B, and C) represents a possible minimum in the cost function.)
As with Chad, so with your anatomical images. It is well for the neuroimager to know that the origin (i.e., coordinates 0,0,0) of both Talairach and MNI space is roughly located at the anterior commissure of the brain; therefore, it behooves you to set the origins of your anatomical images to the anterior commissure as well. The following tutorial will show you how to do this in SPM, where this technique is most important:
Once we have successfully warped our anatomical image to a template space, the reason for coregistration becomes apparent: Since our T2-weighted functional images were in roughly the same space as the anatomical image, we can apply the same warps used on the anatomical image to the functional images. This is where the "Other Images" option comes into play in the SPM interface.
As always, check your registration. Then, check it again. Then, ask someone else to check it. (This is a great way to meet girls.) In particular, check to make sure that the internal structures (such as the ventricles) are properly aligned between the template image and your warped images; matching the internal variability of the template image is much trickier, and therefore much more susceptible to failure - even if the outer boundaries of the brain look as though they match up.
*Actually, it's more accurate to say that it is compressed. However, once I started with the Procrustean thing, I just had to roll with it.