
(Note: Hit the fullscreen option and play at a higher resolution for better viewing)
Now things get serious. I am talking more serious than the projected peak Nutella in 2020, after which our Nutella resources will slow down to a trickle and then simply evaporate. This video goes into detail about the FEAT stats tab, specifically what you should and shouldn't do (which pretty much means just leaving most of the defaults as is), lest you screw everything up, which, let's face it, you probably will anyway. People will tell you that's okay, but it's not.
I've tried to compress these tutorials into a shorter amount of time, because I usually take one look at the duration of an online video and don't even bother with something greater than three or four minutes (unless it happens to be a Starcraft 2 replay). But there's no getting around the fact that this stuff takes a while to explain, so the walkthroughs will probably remain in the ten-minute range.
To supplement the tutorial, it may help to flesh out a few concepts, particularly if this is your first time doing stuff in FSL. The most important part of an fMRI experiment - besides the fact that it should be well-planned, make sense to the subject, and be designed to compare hypotheses against each other - is the timing. In other words, knowing what happened when. If you don't know that, you're up a creek without
The documentation on FSL's website isn't very good when demonstrating how to make timing files, and I'm surprised that the default option is a square waveform to be convolved with a canonical Hemodynamic Response Function (HRF). What almost every researcher will want is the Custom 3 Column format, which specifies the onset of each condition, how long it lasted, and any auxiliary parametric information you have reason to believe may modulate the amplitude of the Blood Oxygenation Level Dependent (BOLD) response. This auxiliary parametric information could be anything about that particular trial of the condition; for example, if you are showing the subject one of those messed-up IAPS photos, and you have a rating about how messed-up it is, this can be entered into the third column of the timing file. If you have no reason to believe that one trial of a condition should be different from any other in that condition, you can set every instance to 1.
Here is a sample timing file to be read into FSL (which they should post an example of somewhere in their documentation; I haven't been able to find one yet, but they do provide a textual walkthrough of how to do it under the EV's part of the Stats section here):
10 1 1
18 1 1
25 1 1
30 1 1
To translate this text file, this would mean that this condition occurred at 10, 18, 25, and 30 seconds relative to the start of the run; each trial of this condition lasted one second; and there is no parametric modulation.
A couple of other things to keep in mind:
1) When setting up contrasts, also make a simple effect (i.e., just estimate a beta weight) for each condition. This is because if everything is set up as a contrast of one beta weight minus another, you can lose valuable information about what is going on in that contrast.
As an example of why this might be important, look at this graph. Just look at it!
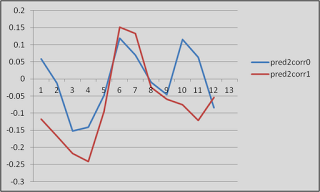 |
| Proof that fMRI data is (mostly) crap |
These are timecourses extracted from two different conditions, helpfully labeled "pred2corr0" and "pred2corr1". When we took a contrast of pred2corr0 and compared it to pred2corr1, we got a positive value. However, here's what happened: The peaks of the HRF (represented here by the timepoints under the "3" in the x-axis, which translates into 6 seconds (3 scans of 2 seconds each = 6 seconds), representing the typical peak of the HRF after the onset of a stimulus) for both conditions were negative. It just happened that the peak for the pred2corr1 condition was more negative than that of pred2corr0, hence the positive contrast value.
2) If you have selected "Temporal Derivative" for all of your regressors, then every other column will represent an estimate of what the temporal derivative should look like. Adding a temporal derivative has the advantage of accounting for any potential lags in the onset of the HRF, but comes at the cost of a degree of freedom, since you have something extra to estimate.
3) After the model is set up and you click on the "Efficiency" tab, you will see two sections. The section on the left represents the correlation between regressors, and the section on the right represents the singular value decomposition eigenvalue for each condition.
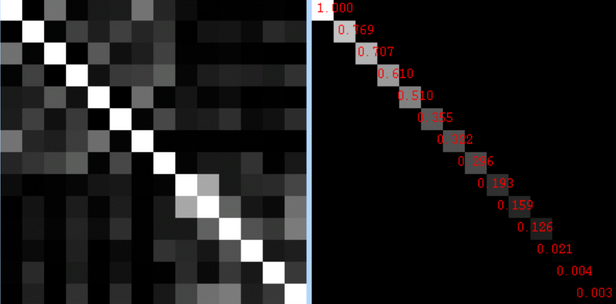 |
| What is an eigenvalue? Don't ask me; I'm just a mere cognitive neuroscientist. |
As for the eigenvalues on the right, I have yet to find out what range of values represent safety and which ones represent danger. I will keep looking, but for now, it is probably a better bet to do design efficiency estimation using a package like AFNI to get a good idea of how your design will hold up under analysis.
That's it. A few more videos will be uploaded, and then the beginning user should have everything he needs to get started.